DIY Bike Repair Stand Thoughts

I was just thinking of ways to improve this stand. With the towel wrapped around the seat post, the bike can twist (not ideal). I tried using some foam pipe insulation that I had laying around but that didn’t do much…


I am trying to find some sort of rubber (maybe a old bike tube) that I could use that is not smooth and would “catch” the seat post. I am thinking I might just have to go riding more to get a new tube or take a visit to the LBS to see if they have any laying around.


Any ideas about what I could use?

DIY Bike Stand

Its been a while… life got in the way (go figure right?) Anyways….

Here is a DIY Bike Stand for you. Since I have recently got into bike repair, I was in need of a bike repair stand. Looking them up online and they can be rather pricey! So I figured I would pull out the weekend warrior and build one myself.


Tools Needed:

-Drill and drill bits

-Wrenches

-Pipe Wrench


Parts List from local Home Depot or Menards:

-1″ rigid threaded pipe (60″ long)

-1″ to 3/4″ 90 degree elbow reducer

-3/4″ rigid threaded pipe (18″ long)

-1″ flange

-3/4″ Pony Clamp

-2′ x 2′ plywood (scrap bin if your lucky!)

-2″ x 4″ piece wood (12″ long is all that is needed for the clamp brace)

-1/2″ carriage bolts (or which ever size fits in your flange) – 4 bolts

-1/2″ fender washers (or which ever size fits in your flange) -8 washers

-1/2″ nuts (non locking) (or which ever size fits in your flange)  – 4 nuts


Once I collected all the materials, I started with the base. Taking the flange and marking holes where I wanted to drill in the plywood for the carriage bolts to go through. Hint: you want them mainly in one corner to counter balance the weight of the bike but not completely in the corner as you will crack the plywood. Before drilling the holes you need to get rid of the wobble that the bolts would create on the bottom. In order to do that, you will have to drill some bigger holes to counter-sink the bolts.Drill the counter-sink holes big enough so the fender washer can fit inside. Drill the counter-sink holes first then drill through with the regular drill bits.

Counter-Sink holes with Fender washers and carriage bolts

Once the carriage bolts can go through, tighten down. Hint: tight but not too tight, too tight will again make the plywood crack

Use washer then tighten down but not too tight (plywood will crack)

The base is finished! Good work. Next up, screw in the 60″ long threaded rigid pipe into the flange and tighten with a pipe wrench or as tight as you can get it.

Next, screw in the 90 degree reducer. This you might need a pipe wrench for in order to get the elbow at the right angle (pardon the pun). Screw in the 3/4″ sized 18″ long threaded pipe into the other end of the elbow. Again pipe wrench would be good but not 100% necessary.
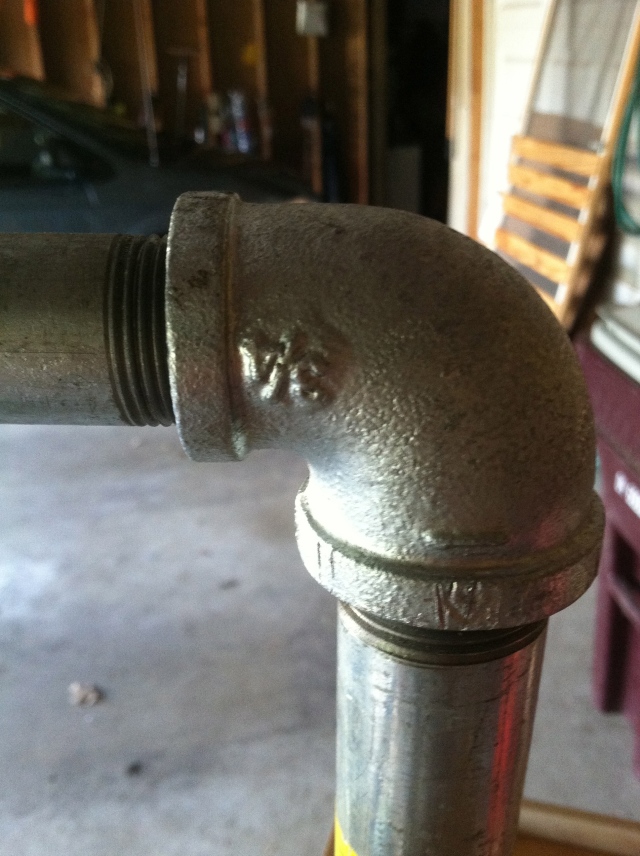
90 Degree 1" to 3/4" Elbow Reducer

Now comes the tricky part! Put the 3/4″ pony clamp on to test for fitting. It should fit well. In order to get the bike to stay, you will need to create a clamping device for a seat post. Take your bike seat post and test it for size. Cut the 2×4 into 2 equally long pieces about ~6″ long. Clamp the two pieces together and drill a 3/4″ hole closer to one end (about 1 1/2″ away from end). This hole will be to slide onto the 3/4″ pipe. It is important that this piece fits almost tightly around the 3/4″ pipe. Once that is fitted well, clamp the pieces back together. Now find a bit that is slightly larger than your seat post. Drill this hole perpendicular to the first hole (see picture). Once this is drilled check for proper fitting for your seat post. Hint: you might have to get something to fill in order to make it fill the hole. Slide onto 3/4″ pipe and put the other end of the pony clamp on. This part was a bit difficult. Trial and error to find just the right angle for the pony clamp.

Wood Piece Close Up! Be carefully not to drill the holes too big when making this piece
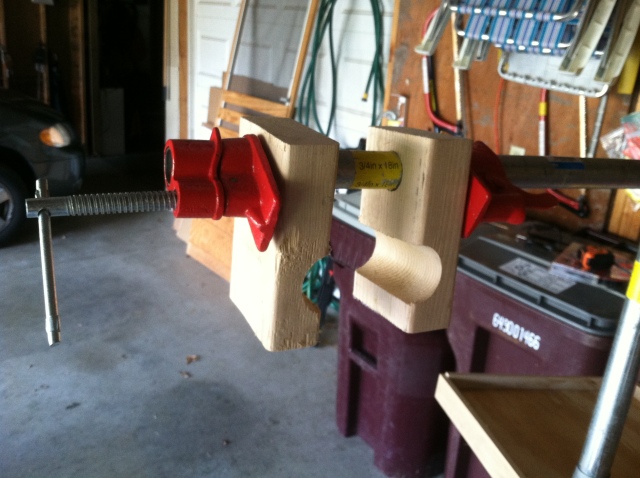
Pony clamp now attached with the wood pieces on

Pony Clamp In Action! I used a towel (temporary) to fill in my gaps on the wood piece

DONE!!!

Grease up those chains, put in a fresh bottom bracket, and put that chain whip to use now!

Time to put a project together...

Feel free to comment on how this could be better. I am always open to new ideas and please POST YOUR PICS!

A First…

This morning marked a first for me… giving a technique lesson to an amateur triathlete.

This proved to be a bit harder than I thought. I have a great knowledge of swimming seeing as I am a swimmer myself. I know the technique part and know it well but teaching it to a person is harder than it looks/appears. I made it through some technical difficulties with the camera (not a good first impression :/ ) but I believe that he knows that I am knowledgeable and know what I am talking about. Mixing my swimming experience with my knowledge of technique and exercise science and I am a coach in the making!

…Well maybe not quite but everyone has to start somewhere right?

The start…

I am just about to start on a bunch of projects…

-Homemade bike repair stand

-swapping frames from an ’10 to ’06 Rockhopper (’10 frame is too big for me, I found out)

-Finishing my Fixie

-Making a beer bottle cap table

-DIY fairing for a roof rack (proving to be quite a bit of thinking going into planning for this one)

I will be slowly but surely knocking them off the list…. so stay tuned

Evening Ride

Yesterday I went out for a nice evening ride along the Mississippi River then around to Lake Nakomis and back. It was a little on the windy side but nothing terrible. I almost ran into some people with the strong wind gusts but luckily no crashes!

I was out on my Allez and was loving every mile…

15 mile ride = pure bliss after a hard day studying

The Bikes… of course!

I almost forgot to show off the bike…

Being as that I have just found my passion and just started collecting and working on my own bikes, I only have a couple but better than nothing.


Bikes…

2010 Specialized Rockhopper M4 Comp Disc

2007 Specialized Allez Elite Triple

1973 Fuji Special Road converted to a Single Speed/Fixie (I will post some of the conversion later, just finished it this past week!)

19_ _ Raleigh Skyline Custom- this is the beater bike that I use to get around campus and around town for small items (will post pics soon)

199_ Schwinn Mesa- Inherited bike from the girlfriend as a commuter after my Hardrock got stolen… (will post pics soon for this one too)


Stolen: Use to have a 2005 Specialized Hardrock Sport Disc but it was stolen from under my dorm last year 😦

This slideshow requires JavaScript.

First Road Ride

I went out for my First road ride of the year. Being in Minnesota make it a short riding season but I will take advantage of the warm weather so early in the year. I went out for a ride to downtown St. Paul (east side) from school on Summit Ave in St. Paul (west side). The trail goes right along the mighty Mississippi river the whole way making for a scenic ride. I went up to the U of M first to lengthen and enjoy my ride. Nothing like having people look at you like you are crazy when it is 48 degrees out and you are on a bike with bike shorts and a jersey.

Summary:

27 miles

16.8 mph pace

Here are some photos that I took while on a quick break on the path by downtown.

This slideshow requires JavaScript.

Welcome!!!

Hey everyone!

I am glad to start my blog and start helping people with sharing my knowledge. First post- check!

Please feel free to comment and reply on any post! The more people we can get going, the most useful and resourceful this blog becomes.

Cheers!

Sam